In this comprehensive guide, we will delve into the essential feature of taking screenshots on the Samsung Galaxy A32 5G. This functionality is integral to modern mobile phones and is conveniently built into the Android 11, One UI 3.0 operating system of your device.
A screenshot is an image capture of what is currently displayed on your phone’s screen. It’s a built-in feature in your Samsung Galaxy A32 5G, meaning no additional apps are required. From saving WhatsApp conversations to capturing Instagram stories or Facebook photos, screenshots are a versatile tool for preserving information.
Step-by-Step Screenshot Guide for Galaxy A32 5G
Discover the simple and effective ways to take screenshots on your Samsung Galaxy A32 5G. Our guide covers various methods, tips, and tricks to capture, edit, and share your screen images effortlessly, enhancing your smartphone experience. How to Screenshot on Samsung Galaxy A32 5G:
- First Step: Navigate to the screen you wish to capture.
- Second Step: Use either the native Android method (pressing power and volume down simultaneously) or Samsung’s own system (swiping the side of your palm across the screen). For the latter, ensure it’s activated in “Advanced functions” in the settings.
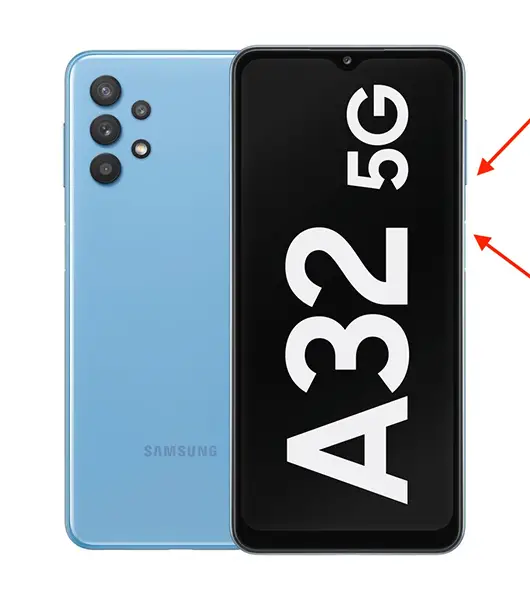
- Third Step: Look for a flash or a notification indicating a successful capture.
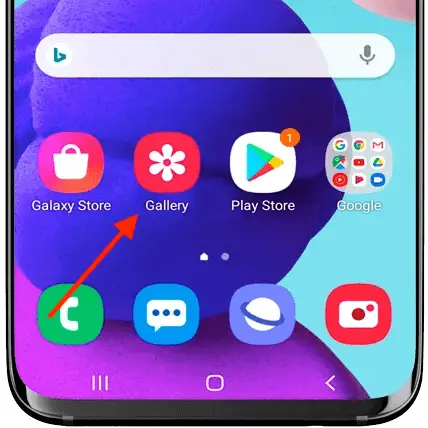
- Fourth Step: Find the screenshot automatically saved in your gallery, identifiable by a photo icon or, in some cases, the Google Photos icon.
Samsung Galaxy A32 5G Screenshot: Alternative Methods
The quick access panel method for taking screenshots on the Samsung Galaxy A32 5G is a user-friendly alternative to physical buttons. Here’s a more detailed explanation:
- Accessing the Quick Access Panel: To begin, navigate to the screen you want to capture. Then, swipe down from the top of your phone’s screen. This action will reveal the quick access panel, which is essentially a menu of shortcuts to various features and settings on your device.
- Locating the Screenshot Icon: Look for the screenshot icon within this panel. It’s typically represented by an icon resembling a camera or a pair of scissors. If you don’t see the screenshot icon immediately, you might need to swipe down again to expand the panel and reveal more options. In some cases, if the screenshot icon isn’t there, you may need to add it to the quick access panel through the button order settings.
- Capturing the Screenshot: Once you find the screenshot icon, simply tap on it. Your Samsung Galaxy A32 5G will capture an image of whatever is currently displayed on your screen at that moment.
- Notification and Gallery: After you tap the screenshot icon, you will usually see a brief animation or flash indicating that the screenshot has been taken. A notification might also appear. The captured screenshot is automatically saved in your phone’s gallery, where you can view, edit, or share it.
This method is particularly useful for those who find it more convenient to use on-screen options rather than physical button combinations. It’s also a good alternative if you’re using your phone in a manner where the buttons are hard to reach or if you have any issues with the physical buttons.

Take Screenshot Galaxy A32: Capturing a Scrolling Screenshot
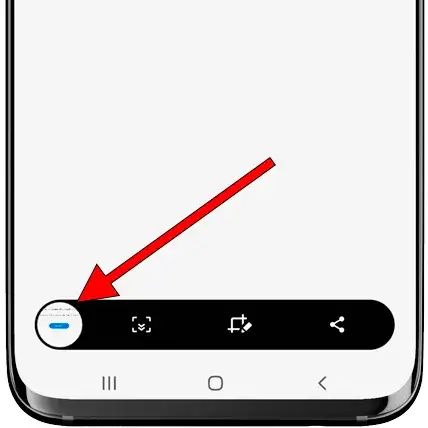
The Scrollshot feature on the Samsung Galaxy A32 5G revolutionizes how we capture phone information. It’s perfect for when a single screenshot isn’t enough to cover all the content you need. Start by taking a standard screenshot using your preferred method, such as simultaneously pressing the power and volume down buttons. Once captured, a menu appears at the screen’s bottom. Here, select the “Scrollshot” option.
This action triggers your phone to automatically scroll down the page, capturing everything in its path. It’s an ideal solution for saving long articles, detailed social media feeds, or extensive conversations in one comprehensive image. Once you’ve captured everything needed, the image is saved to your gallery, ready for any edits or shares. This seamless process simplifies capturing lengthy content, making storing and sharing more detailed information a breeze.
Galaxy A32 5G Screen Capture: Editing and Sharing
After capturing a screenshot on your Samsung Galaxy A32 5G, the possibilities extend beyond just saving the image. The screenshot is automatically organized in your gallery, sorted by date for easy access. From here, you can dive into a suite of editing options. Whether it’s cropping, adding text or doodles, or adjusting the colors, your phone’s built-in editing tools allow you to customize the screenshot to your liking.
Once you’re satisfied with the edits, sharing your creation is just a few taps away. You can easily send it through your preferred social media platforms, messaging apps, or email, making the process of capturing, personalizing, and sharing your screen content both efficient and enjoyable.
FAQ: Screenshot Features on Samsung Galaxy A32 5G
Can I capture a scrolling screenshot on my Samsung A32 5G? If so, how?
Yes, the Samsung A32 5G supports scrolling screenshots. After taking a standard screenshot, select the “Scrollshot” option that appears. The phone will then automatically scroll and capture the extended content. Tap the screen to stop the scrolling at any point.
Is it possible to edit a screenshot immediately after taking it on the Galaxy A32 5G?
Absolutely. Once a screenshot is captured on the Galaxy A32 5G, editing options appear instantly. You can crop, add text, draw, or apply various filters right away, without needing to navigate to any other app or setting.
Where are screenshots saved on the Samsung Galaxy A32 5G?
Screenshots taken on the Samsung Galaxy A32 5G are automatically saved in the phone’s gallery. You can find them conveniently sorted by date. The gallery can be accessed directly from the home screen or the photos app.
How can I share a screenshot from my Galaxy A32 5G directly after capturing it?
Right after capturing a screenshot, you’ll see options to share it. Tap on the share icon and choose your preferred app or contact to send it to. This feature makes immediate sharing seamless and convenient.
Are there any voice commands to take a screenshot on the Samsung A32 5G?
Yes, you can use voice commands to take a screenshot on the Samsung A32 5G. Set up Bixby or Google Assistant on your device, and then simply say the command like “Take a screenshot” to capture the screen without using your hands.
Can I take a screenshot on my Galaxy A32 5G without using the physical buttons?
Definitely. Apart from the button method, you can capture a screenshot by swiping the edge of your hand across the screen or using the screenshot icon in the quick access panel. Ensure these features are enabled in your settings.
How do I change the screenshot format or quality on my Samsung A32 5G?
To change the screenshot format or quality on your Galaxy A32 5G, go to the settings menu and look for the screenshot settings. Here, you can adjust the resolution, format (such as JPG or PNG), and other quality settings as per your preference.
Our Final Words
Capturing screenshots on the Samsung Galaxy A32 5G is a simple yet powerful feature. With this guide, you can effortlessly save, share, and manage screen captures. Remember, the more you use these features, the more intuitive they become, enhancing your overall smartphone experience. Happy screenshotting on your Galaxy A32 5G!
 (1 votes, average: 5.00 out of 5)
You need to be a registered member to rate this.


Leave a Reply