Are you looking for an easy way to flash and remove FRP on Nokia phones? Look no further! This blog post will provide you with step-by-step instructions for using the EDL Point Test Point to flash and remove FRP from your Nokia smartphones such as Nokia C32, Nokia C22, Nokia G22, Nokia C02, Nokia C12, Nokia X30, Nokia G60, Nokia C31, Nokia G400, Nokia G11 Plus, Nokia C200, Nokia C100, Nokia C21 Plus, Nokia G21, Nokia G300, Nokia x100, Nokia C20 Plus, Nokia C01 Plus, Nokia X20, etc.
We’ll walk you through the process of setting up the EDL Point Test Point and then how to flash and remove FRP on your device. With this guide, you’ll be able to easily flash and remove FRP on your Nokia device in no time.
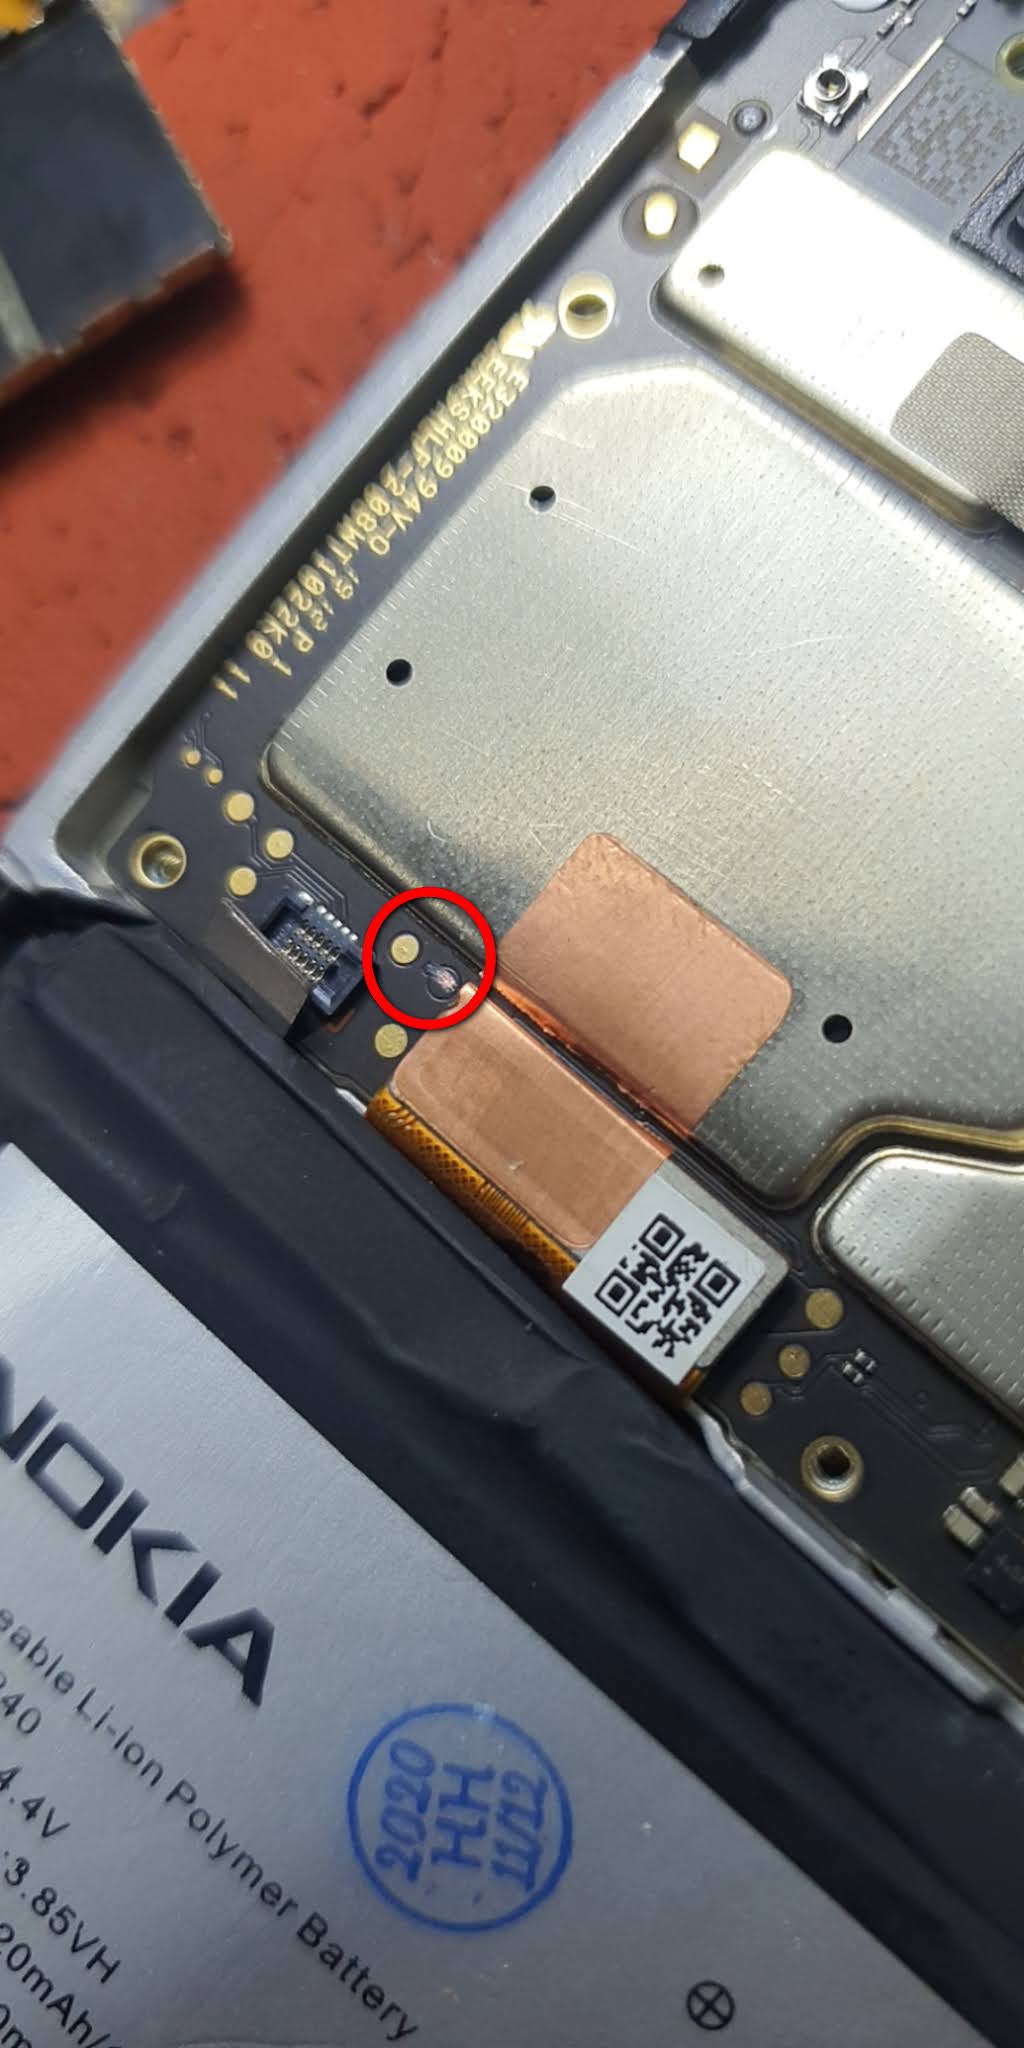
Identifying EDL Points on the Nokia Phones
Identifying EDL (Emergency Download) points on the Nokia phones is an important step for anyone who wants to perform a firmware flash or remove FRP (Factory Reset Protection). Luckily, it is not too difficult and can be done with a few simple steps.
First, you will need to locate the test point in the Nokia device. This can usually be found at the bottom of the device next to the battery compartment. The test point will look like two small metal contacts that are connected to the main board. It may also be labeled as a “TP”.
Next, you will need to connect a specialized tool such as a multimeter or continuity tester to the two metal contacts. This will allow you to confirm if there is a connection between the two contacts and identify whether or not it is a working EDL point.
Once you have confirmed that the EDL point is working, you can proceed with flashing the Nokia device or removing the FRP. It is important to remember that flashing the device may void your warranty so it is advised that you check with your manufacturer before attempting to do so.
Identifying EDL points on the Nokia device is an essential step for anyone who wants to successfully flash or remove FRP from their device. With the right tools and a little patience, you can easily locate and confirm whether or not an EDL point is working.
Preparing Your Device for Firmware Flashing
Flashing a new firmware on your Nokia phone is an important step to keep your phone up to date and secure. Before you start the flashing process, you must make sure that your device is properly prepared for it.
The first thing you need to do is to back up any important data on your Nokia device before starting the process. This will ensure that you don’t lose any important information in case of failure.
Once you have backed up your data, the next step is to enable the USB debugging mode on your device. To do this, go to the Settings menu on your device, and then select “Developer Options”. From here, enable the “USB Debugging” option.
Finally, you will need to download and install the necessary drivers for your device. Depending on the model of your Nokia G21, you may need to download different drivers. Once you have downloaded the correct drivers, install them on your computer, and then restart your device.
Once these steps are completed, you can now start the process of flashing your Nokia phone. Make sure to follow all the instructions carefully to ensure that the process goes smoothly.
Flashing Firmware on the Nokia Phones
If you need to flash the firmware on your Nokia device, you’ll first need to identify the EDL points. Once you’ve identified the points, it’s time to prepare your device for flashing.
Before beginning, make sure your Nokia phone is powered off and the battery is removed.
Once the phone is powered down, you can proceed with connecting it to the computer via the EDL cable. Make sure the connection is tight and secure before beginning.
Once connected, download and install the appropriate drivers for your device. After this is done, open up the Qualcomm Flash Tool and load the firmware package onto the tool. Choose the “Download” option, and the tool will begin to flash your device.
Make sure that the flashing process is completed without any errors. If there are errors, try restarting the process. After successful flashing, you should be able to boot into your device’s normal operating system.
That’s all there is to flash the firmware on your Nokia device! Make sure you follow all of the steps carefully to ensure a successful flashing process.
Removing FRP Lock on the Nokia Phones
If you’re looking to remove the FRP lock from your Nokia device, then you’ll need to use EDL (Emergency Download) points. Fortunately, accessing the EDL points on the Nokia phone is a straightforward process. Here’s what you’ll need to do:
- Power off your Nokia device.
- Locate and remove the back cover of the device.
- Find the two red-colored test point pins located near the USB port.
- Connect a data cable to the two pins and a compatible PC or laptop.
- Open up a command window and type in “fastboot oem unlock”.
- Press Enter and wait for the process to finish.
- Once complete, reboot your device and you should now be able to access the device without the FRP lock.
Using EDL points to remove the FRP lock on the Nokia is a quick and easy process that can be completed in a matter of minutes. If you follow the steps outlined above, you should be able to successfully remove the FRP lock from your device in no time!
Troubleshooting Common Issues During Firmware Flashing
When flashing firmware on a Nokia, it is important to be aware of any potential issues that could arise. This section will provide troubleshooting tips for the most common issues faced when flashing firmware.
- “Error in Flashing”: If you get an error message during the flashing process, there are a few possible causes. First, check to make sure you have the correct firmware version installed. You can do this by comparing your device’s current version number with the one available on Nokia’s website. If they don’t match, then you should try downloading and installing the correct firmware version. Second, check your device’s connection to the computer. Make sure the USB cable is firmly connected to both devices and that the power source is working. If none of these steps solve the problem, you may need to contact Nokia support for further assistance.
- “Device Not Responding”: If your device is not responding after you start the flashing process, the first thing to do is unplug and replug the USB cable to make sure it has not been disconnected. You can also try resetting the device by pressing and holding the power button for about 10 seconds. If this does not work, you should contact Nokia support for help.
- “Device Stuck in Boot Loop”: If your device is stuck in a boot loop after flashing, this could mean that there is a conflict between the new firmware version and the old one. To resolve this issue, you can try using the “Safe Mode” feature on the Nokia phone to troubleshoot the issue. To access Safe Mode, press and hold the Volume Down + Power buttons for about 10 seconds. From here, you can select the “Uninstall Updates” option to revert to an earlier version of the firmware.
By following these steps and troubleshooting tips, you should be able to successfully flash the firmware on your Nokia G21 device and remove the FRP lock. However, if you continue to experience issues, it may be best to contact Nokia support for further assistance.
Tips for Safely Flashing Firmware on Your Nokia Device
Flashing firmware on your device can be a tricky process, but if done correctly it can be a great way to keep your device up to date and running smoothly. To make sure that you are safely flashing firmware on your device, here are a few tips to follow:
- Backup your data – It is always important to back up any important data from your device before flashing firmware, just in case anything goes wrong during the process.
- Have the latest firmware – Make sure you have the most recent firmware for your device, as older versions can cause problems when trying to flash.
- Use an EDL point – An EDL point (emergency download link) allows for safe and efficient flashing of firmware on your device.
- Follow instructions carefully – Make sure to follow all instructions and warnings carefully when flashing your device.
- Test after flashing – After flashing, it’s important to test your device to make sure everything is working correctly.
Following these tips will help you safely and efficiently flash the firmware on your device, keeping it up to date and running smoothly.
Conclusion
Flashing firmware and removing FRP on the Nokia phone is an effective way to upgrade your device and make it more secure. Following the instructions provided in this post will ensure that you successfully flash the firmware on your device and remove the FRP lock.
Be sure to follow all safety protocols when working with your device, as improper flashing can cause serious damage. With the right preparation, a bit of patience, and a few helpful tools, you can keep your Nokia phone running in peak condition for years to come.
 (1 votes, average: 5.00 out of 5)
You need to be a registered member to rate this.


Leave a Reply